I have a few RHEL7 instances setup in Google Cloud Platform (GCP) as a demo environment for a Centrify PAM setup. The first step in getting these things connected to the Centrify Tenant / Portal is to install the agent on the box. To make life easy, I like to use ‘yum’. So first up, install the Centrify repo to the server and then install everything I need.
Step 1: Generate Your Credentials
First things first, you need to get your repo credentials. To do this, you need to have an active account with Centrify, and then login here:
https://www.centrify.com/support/customer-support-portal/repos/
When you login here for the first time, you will need to click the button to generate your Credentials. You’ll then see this screen showing you that they’re generating. Takes a few seconds

Once the credentials are created, you’ll see them in your custom link. This username and password is unique to your account. Please treat it as a secret and keep it out of public source control like github. You have the option to reset the Repo Key with the button below, but be warned, any scripts that have these credentials hard-coded in there will no longer work, and you’ll have to update with the new credentials generated.

Step 2: Create Your Repo File
Click on the respective tab at the top for your flavor of Linux. I’m using RHEL so I’m picking Yum Repo. On on this page you’ll see all the instructions to setup the repo for your box. Your credentials will be in the URL given on the Centrify site, so make sure you don’t share them.
On your Linux box, run this command:
$ sudo vi /etc/yum.repos.d/centrify.repo
Then paste the following lines, swap out USERNAME & PASSWORD for your real credentials and then save the file:
[centrify] name=centrifybaseurl=https://USERNAME:[email protected]/rpm-redhat/
enabled=1
repo_gpgcheck=1
gpgcheck=1
gpgkey=https://downloads.centrify.com/products/RPM-GPG-KEY-centrify

Step 3: Verify Repo Setup
Now that the repo is setup, you’ll want to test it out.
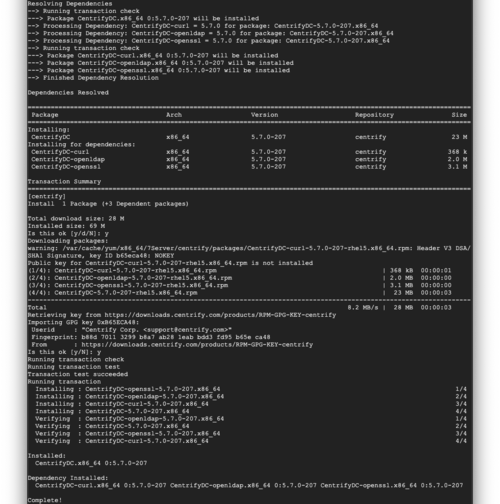
$ sudo yum list Centrify*
$ sudo yum info CentrifyDC
centrify
Available Packages
Name : CentrifyDC
Arch : i386
Version : 5.3.1
Release : 324
Size : 24 M
Repo : centrify
Summary : Centrify DirectControl Agent
URL : http://www.centrify.com/
For sanity sake, I always run a “$ sudo yum update” before installing anything just to be sure I’m getting the latest libraries.
Step 4: Install the Centrify Linux Agent
Lastly, kick off the installation of the Centrify Agent:
$ sudo yum install CentrifyDC

Step 5: Automate All of This
For this last step, I’ll leave it up to you on how you setup your servers, but you should make this part of your deployment process so that whenever you have new boxes spinning up, the agent is automatically downloaded, installed and enrolled upon initial boot up.
Cheers!